We're so glad we put those rubber tiles down since this afternoon my mom's water heater busted.
We were trying to give T and his cuz a bath and the water never got hot. I assumed it was a pilot light out.
Nope - the entire thing was draining through our garage. But it went neatly - swirled around to the drain in the middle of the floor.
The tiles are airing off in the backyard over night and a fan is getting rid of the excess moisture.

July 30, 2011
July 27, 2011
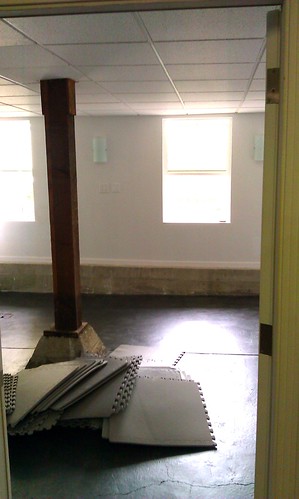
Sunset District Garage Room Remodel
When we downgraded from a three bedroom rental to our very own two bedroom flat, we knew we would need to build out the garage a bit so we could have dedicated office space. We both work from home a good bit.
After going through several unreliable or poor quality contractors, we found someone who we liked, showed up on time, and had great references. He also gave us a quote along the same lines as everyone else, about $15,000 more than we thought we would spend.
We had already spent about $10,000 to replace and move the water heaters and furnaces (all cash we had on hand thanks to our Redfin rebate).
He worked with us to bring it down a TON, but it would have left us with lot of finish work to do ourselves (and not fun stuff). We decided that:
1) if we were spending a ton of money on something, we wanted it to be DONE when it was done and not rely on us using many weekends to make it livable, and
2) we would borrow the rest of the money to make it work.
So we did...
Before
After
Before
After

Adding a door with a window and making the windows larger made a HUGE difference in the amount of natural light in this room. We also decided to go without ceiling lights and do wall sconces and floor lamps to make the lighting look less industrial and more natural.
Before
During
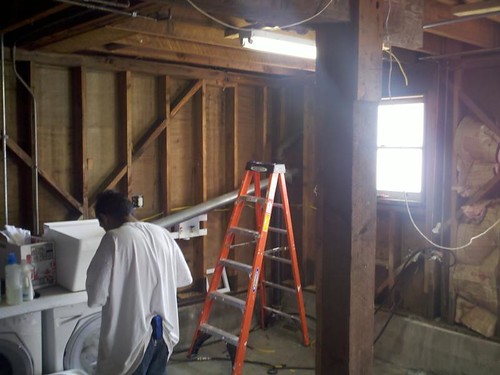
After
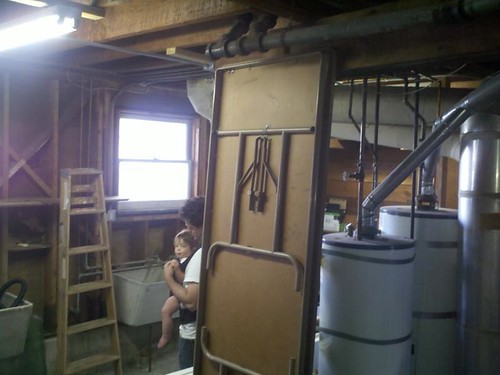
T likes to take that shopping car (which belongs to his g-ma) and run across the floor and SLAM it into the walls - which is okay, because its all cement foundation :)
When they were "done" with what we had gotten the quote for, this is what we ended up with:
We decided to stain the cement ourselves using the tutorial from Young House Love, and it was JUST that easy. I thought I would be staining the foundation that came up to the wall (we decided not to sheetrock over it b/c it would take away a lot of square footage and be expensive), but I did one test spot and decided to try painting it instead.
Dark Grey Stain from Home Depot
I painted the foundation using a big old 5 gallon can of paint+primer that we bought a million years ago for our old house and it was tedious, but worked great - I love how it looks.
Before foundation was white
After foundation was white
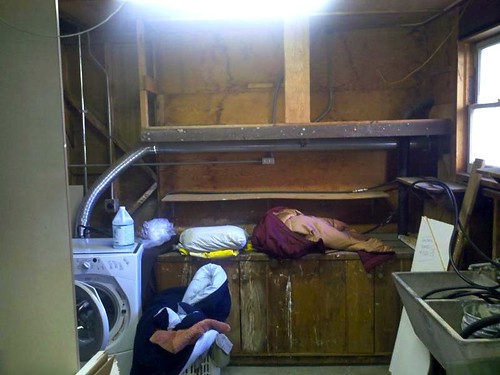
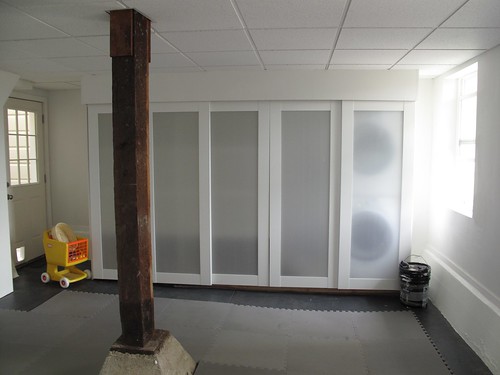
I hated the way the washer and dryer looked though. And this multi-purpose Office / Guest Room / Rec Room / Craft Room needed to be nice enough that my mother in law could stay. So I asked our contractor for a quote to build us cabinets. We were planning on spending about $900 on ikea cabinets anyway, so when he quoted us $700 INCLUDING a way to hide the washer dryer, we had him come back the next day to do it. Rather than build or buy doors at home depot or lowes, we had him pick up doors from ikea - which we love.
Here are our built in cabinets with TONS o storage

The doors slide and we'll have to figure out a babyproofing method quick :)
We bought some rubber floor tiles for $.99 a sq foot. When they arrived, We let them off-gas for three days and the smell was gone pretty quickly. The minute T got downstairs he starting running and trying to jump because they felt so good on his feet :) We still need to add and cut the edge tiles down to size. We're going to get some rugs, a sectional sleeper sofa, and some other seating option down here, but mostly keep it open!
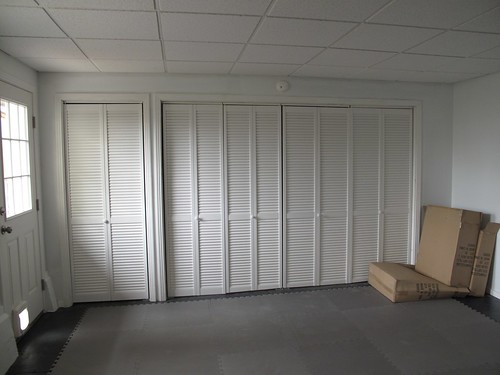
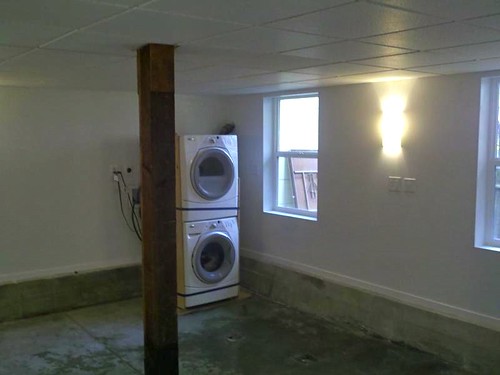
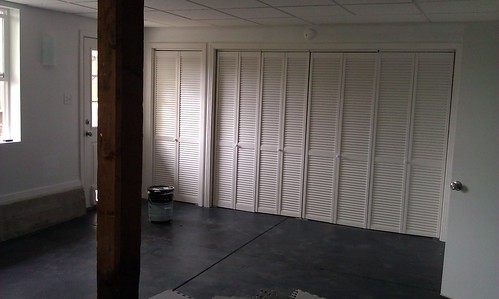
The wall opposite the washer and dryer has bi-fold doors

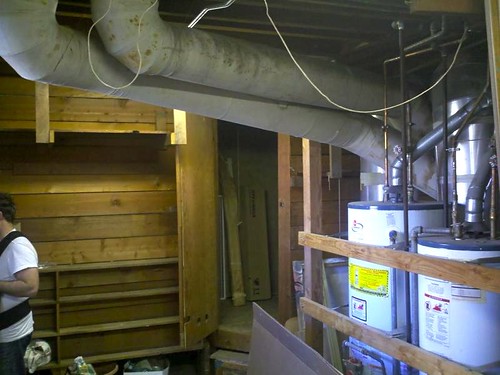
(that's the furnace, water heater, and closet where bubbs keeps his weights, weight bench and japanese folding desk that he takes in and out when he wants to work).
We still have a lot to do down there, but hopefully we can be organized about it and make sure that the room stays nice and clear.
After going through several unreliable or poor quality contractors, we found someone who we liked, showed up on time, and had great references. He also gave us a quote along the same lines as everyone else, about $15,000 more than we thought we would spend.
We had already spent about $10,000 to replace and move the water heaters and furnaces (all cash we had on hand thanks to our Redfin rebate).
He worked with us to bring it down a TON, but it would have left us with lot of finish work to do ourselves (and not fun stuff). We decided that:
1) if we were spending a ton of money on something, we wanted it to be DONE when it was done and not rely on us using many weekends to make it livable, and
2) we would borrow the rest of the money to make it work.
So we did...
Before
After
Before
After
Adding a door with a window and making the windows larger made a HUGE difference in the amount of natural light in this room. We also decided to go without ceiling lights and do wall sconces and floor lamps to make the lighting look less industrial and more natural.
Before
During
After
T likes to take that shopping car (which belongs to his g-ma) and run across the floor and SLAM it into the walls - which is okay, because its all cement foundation :)
When they were "done" with what we had gotten the quote for, this is what we ended up with:
- Cement floors
- Floating washer and dryer
- No Paint on the walls
We decided to stain the cement ourselves using the tutorial from Young House Love, and it was JUST that easy. I thought I would be staining the foundation that came up to the wall (we decided not to sheetrock over it b/c it would take away a lot of square footage and be expensive), but I did one test spot and decided to try painting it instead.
Dark Grey Stain from Home Depot
I painted the foundation using a big old 5 gallon can of paint+primer that we bought a million years ago for our old house and it was tedious, but worked great - I love how it looks.
Before foundation was white
After foundation was white
I hated the way the washer and dryer looked though. And this multi-purpose Office / Guest Room / Rec Room / Craft Room needed to be nice enough that my mother in law could stay. So I asked our contractor for a quote to build us cabinets. We were planning on spending about $900 on ikea cabinets anyway, so when he quoted us $700 INCLUDING a way to hide the washer dryer, we had him come back the next day to do it. Rather than build or buy doors at home depot or lowes, we had him pick up doors from ikea - which we love.
Here are our built in cabinets with TONS o storage
The doors slide and we'll have to figure out a babyproofing method quick :)
We bought some rubber floor tiles for $.99 a sq foot. When they arrived, We let them off-gas for three days and the smell was gone pretty quickly. The minute T got downstairs he starting running and trying to jump because they felt so good on his feet :) We still need to add and cut the edge tiles down to size. We're going to get some rugs, a sectional sleeper sofa, and some other seating option down here, but mostly keep it open!
The wall opposite the washer and dryer has bi-fold doors
(that's the furnace, water heater, and closet where bubbs keeps his weights, weight bench and japanese folding desk that he takes in and out when he wants to work).
We still have a lot to do down there, but hopefully we can be organized about it and make sure that the room stays nice and clear.
July 25, 2011
"We're Going on a Bear Hunt" is the best book ever. Period.
I thought this book would be WAY too mature for my munchkin.
At 8 months, he and his cousins (2 &4) all sat (for a long time) listening to it.
At 13 months he's beat boxing, doing the hand motions, and making the swishy sawchy sounds.
It is by far his favorite.
Along with...
"Duck Ellington (swings by the zoo)."

He likes to make the animal noises (especially monkey, lion, and duck), say "turtle" and "ball, and loves the page with ALL the animals on one page.
"Who Made That Smell?" is another favorite.
 He mostly likes to go to the page with the hippo and say "hippo")
...and "Baby's Bedtime."

This book has been his favorite for ever. It was a gift from his aunt, and every night he points out the mama and daddy, the ball, and we kiss all the people good night.
July 22, 2011
Blueberries stain even after hours
T's been super sick. Well, sick in that he pukes a couple times a day, but is totally fine otherwise.
We found this out when he projectile vomited three times at the farmer's market.
We thought he was over it, so we took the towels out of his bed and put him to sleep. At 12:30 he woke up screaming and proceeded to puke all over his bed. We brought him into our bed but this morning I realized that the blueberries he had eaten for lunch yesterday stained our white sheets. Our beautiful new white sheets. Who knew they kept their color?
July 17, 2011
Spatulas are for painting, too!
The big empty wall in the living room has been tough. We have LOT of pattern going on already in the curtains, the TV "hider" and the art already in the house.
We also wanted a HUGE piece. After searching on etsy and ebay I found a couple pieces I liked - but they were expensive. Like way more than I wanted to spend.
I decided to diy some art. After a suggestion on apartmenttherapy.com, I printed a 40% off coupon for Michael's and bought a huge canvas (price with coupon: $60 bucks). I didn't know the supplies I would need - the internets were amazingly unhelpful when I didn't know the right search terms, so I posted on facebook for help and found out I would need modeling or molding paste.
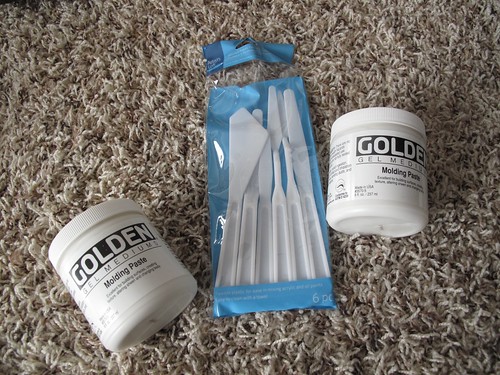
Michaels had some and little tubs were 14 bucks each (ouch).
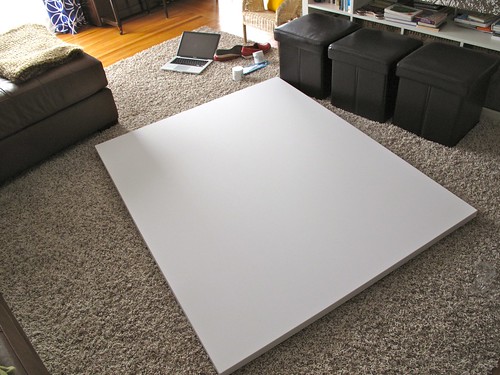
I bout two tubs and a bunch of white paint assuming I mixed them together, but when I got home I realized that you were supposed to paint over the modeling paste. My two little tubs got me about a 1/4 of the way across the canvas...
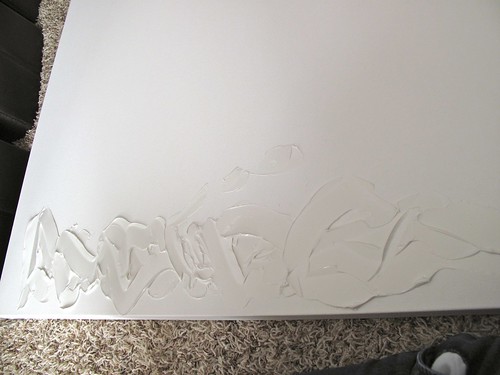
so I had to make another trip (to another store - long story) for another brand of modeling paste...but it worked out okay. Not perfect, because the two brands are two different colors. At some point, I'll paint it all white, but for now it works!
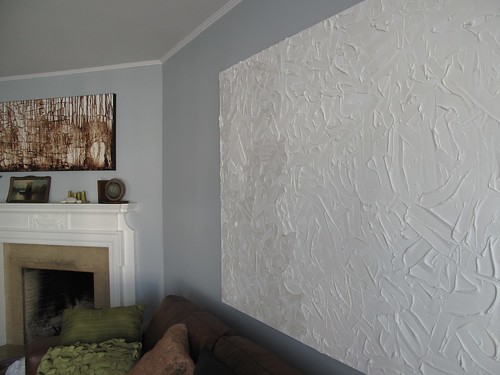
(needs to be hung a little higher and straighter, but that is the only place its safe from the munchkin while it dries :)
We also wanted a HUGE piece. After searching on etsy and ebay I found a couple pieces I liked - but they were expensive. Like way more than I wanted to spend.
I decided to diy some art. After a suggestion on apartmenttherapy.com, I printed a 40% off coupon for Michael's and bought a huge canvas (price with coupon: $60 bucks). I didn't know the supplies I would need - the internets were amazingly unhelpful when I didn't know the right search terms, so I posted on facebook for help and found out I would need modeling or molding paste.
Michaels had some and little tubs were 14 bucks each (ouch).
I bout two tubs and a bunch of white paint assuming I mixed them together, but when I got home I realized that you were supposed to paint over the modeling paste. My two little tubs got me about a 1/4 of the way across the canvas...
so I had to make another trip (to another store - long story) for another brand of modeling paste...but it worked out okay. Not perfect, because the two brands are two different colors. At some point, I'll paint it all white, but for now it works!
(needs to be hung a little higher and straighter, but that is the only place its safe from the munchkin while it dries :)
July 14, 2011
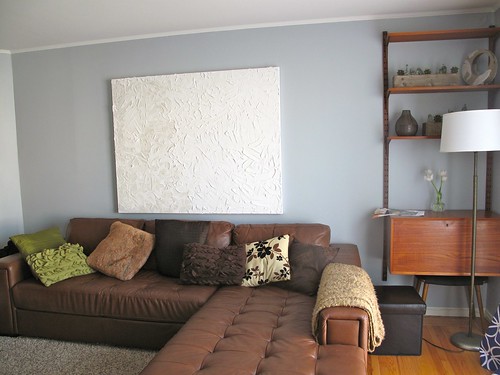
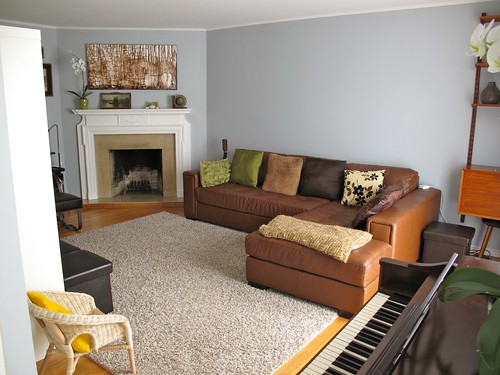
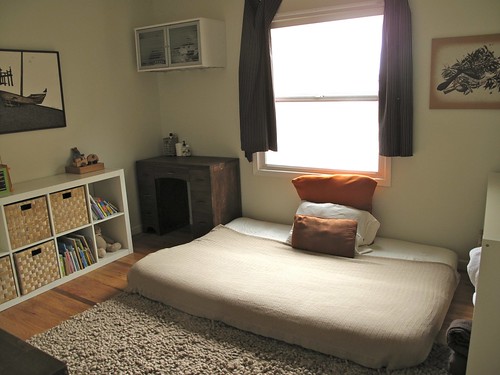
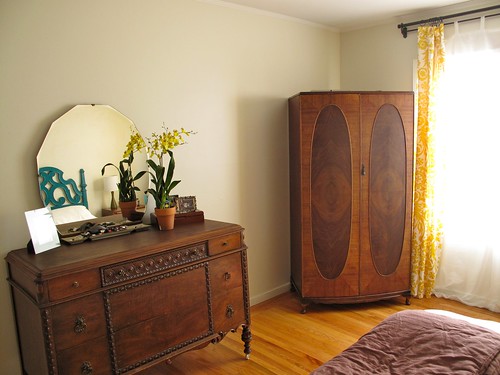
Room Update Photos
We've slowly but surely started getting rooms a little closer to "not embarrassing."


July 13, 2011
Scrolly dreamcatcher of a headboard is PAINTED!
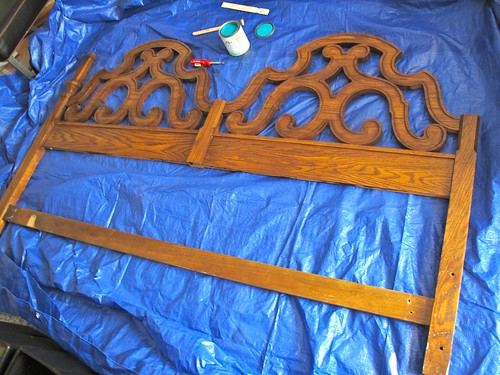
These are all the steps I didn't take:
Step One: sand the headboard (yeah, didn't do that)
Step Two: prime the headboard (nope, not that one either)
This is what I DID do.
With an hour between my day finishing up and the baby coming home, I got the tarp from the garage, laid it out on the living room rug and painted and painted (Juniper from Benjamin Moore) in zero VOC paint. The paint ran right off the headboard, beaded up, it was awesome. But I let the first "coat" dry and started again. After three coats, it looked HORRIBLE.
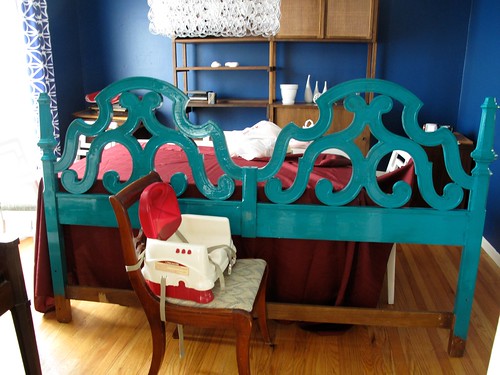
You can see all the splotches and drips here (but it is SO much worse up close).
After letting it dry and trying to keep the baby AWAY from it once he arrived, I propped it up behind the bed.
I love love love it. But the pictures had to go. They were way too modern for my scrolly headboard and swirly curtains.
The plan is to saw off the bottom of the legs and screw it into the bedframe - but I have no idea when that's gonna happen :)
Our Yellow and Turquoise Bedroom is off to a good start...but there is so much more to do.
Subscribe to:
Posts (Atom)